Jutsu Studio
In short
- Put one face on a sheet. When a sheet carried several faces, or a small face in the full-body view next to a large portrait, the video model mixed them and the face changed between wide shots and close-ups.
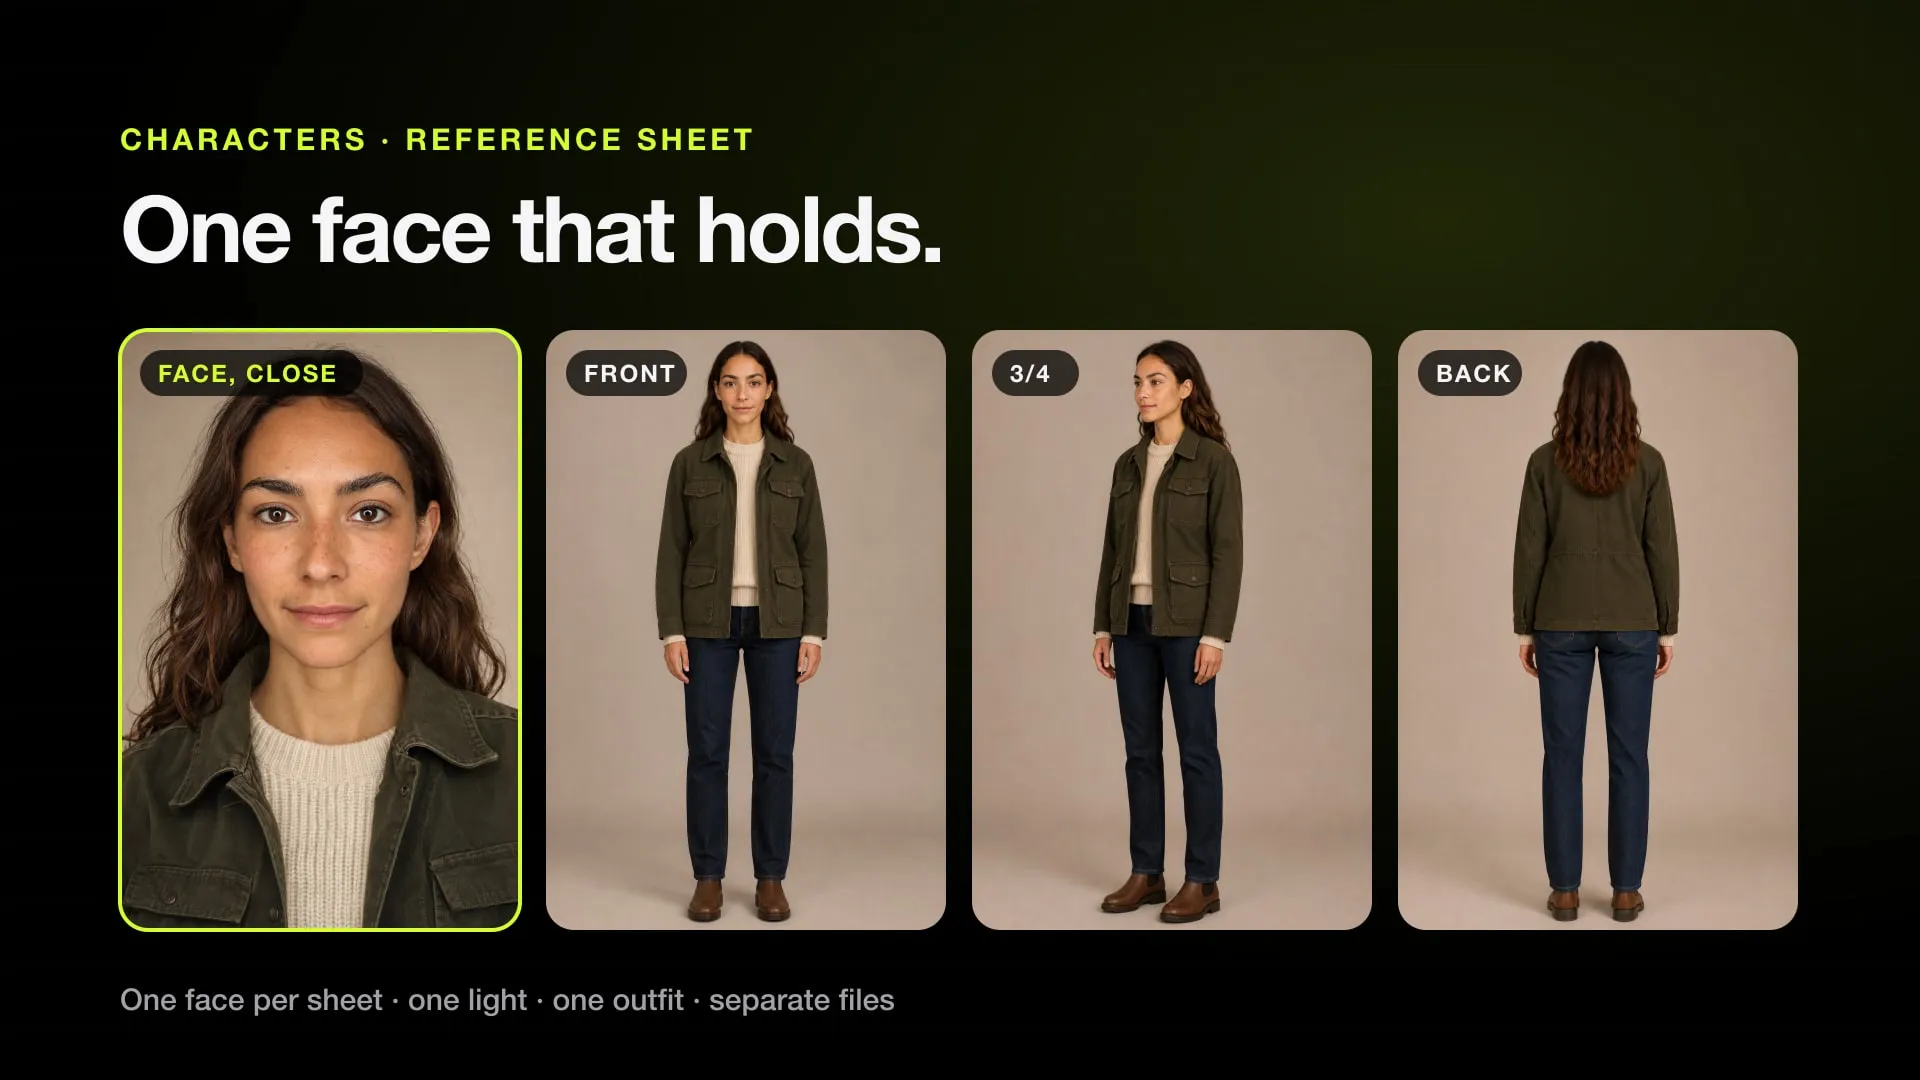
- A working sheet is a large face close-up plus full body front, three-quarter and back, on one plain background, in one light and one outfit. Profile and an expression panel help close-up shots.
- Cut the sheet into separate files and give them to the model as separate references. A collage read as several people more often than as one.
- Face size decides the eyes. In our review of 20 swaps, faces 130 px or wider in the 480p draft kept their eyes, 80 to 130 px went soft, and under 80 px the eyes broke whatever the prompt said.
- Keep one fixed description per character and paste it word for word. Before we did, one of our characters was described 12 different ways across 13 videos.
- The example sheet in this guide took four casting portraits on Higgsfield Soul 2.0 for 0.5 credits, then six panels in one ChatGPT chat with the kept face as the only reference. The face held in all six without a retry.
A character an AI video model can hold is one face, on one sheet, in one outfit and one light, given to the model as separate images and described in the same words every time. Most “different face in every shot” problems come from breaking one of those, not from the model.
This guide is what we learned building recurring characters for short videos on Higgsfield with Seedance 2.5 and Genjutsu, checked against Higgsfield Academy’s character lessons and the model makers’ own guides. Where we and the Academy disagree, it says so. The character below was made for this guide, step by step as it describes.
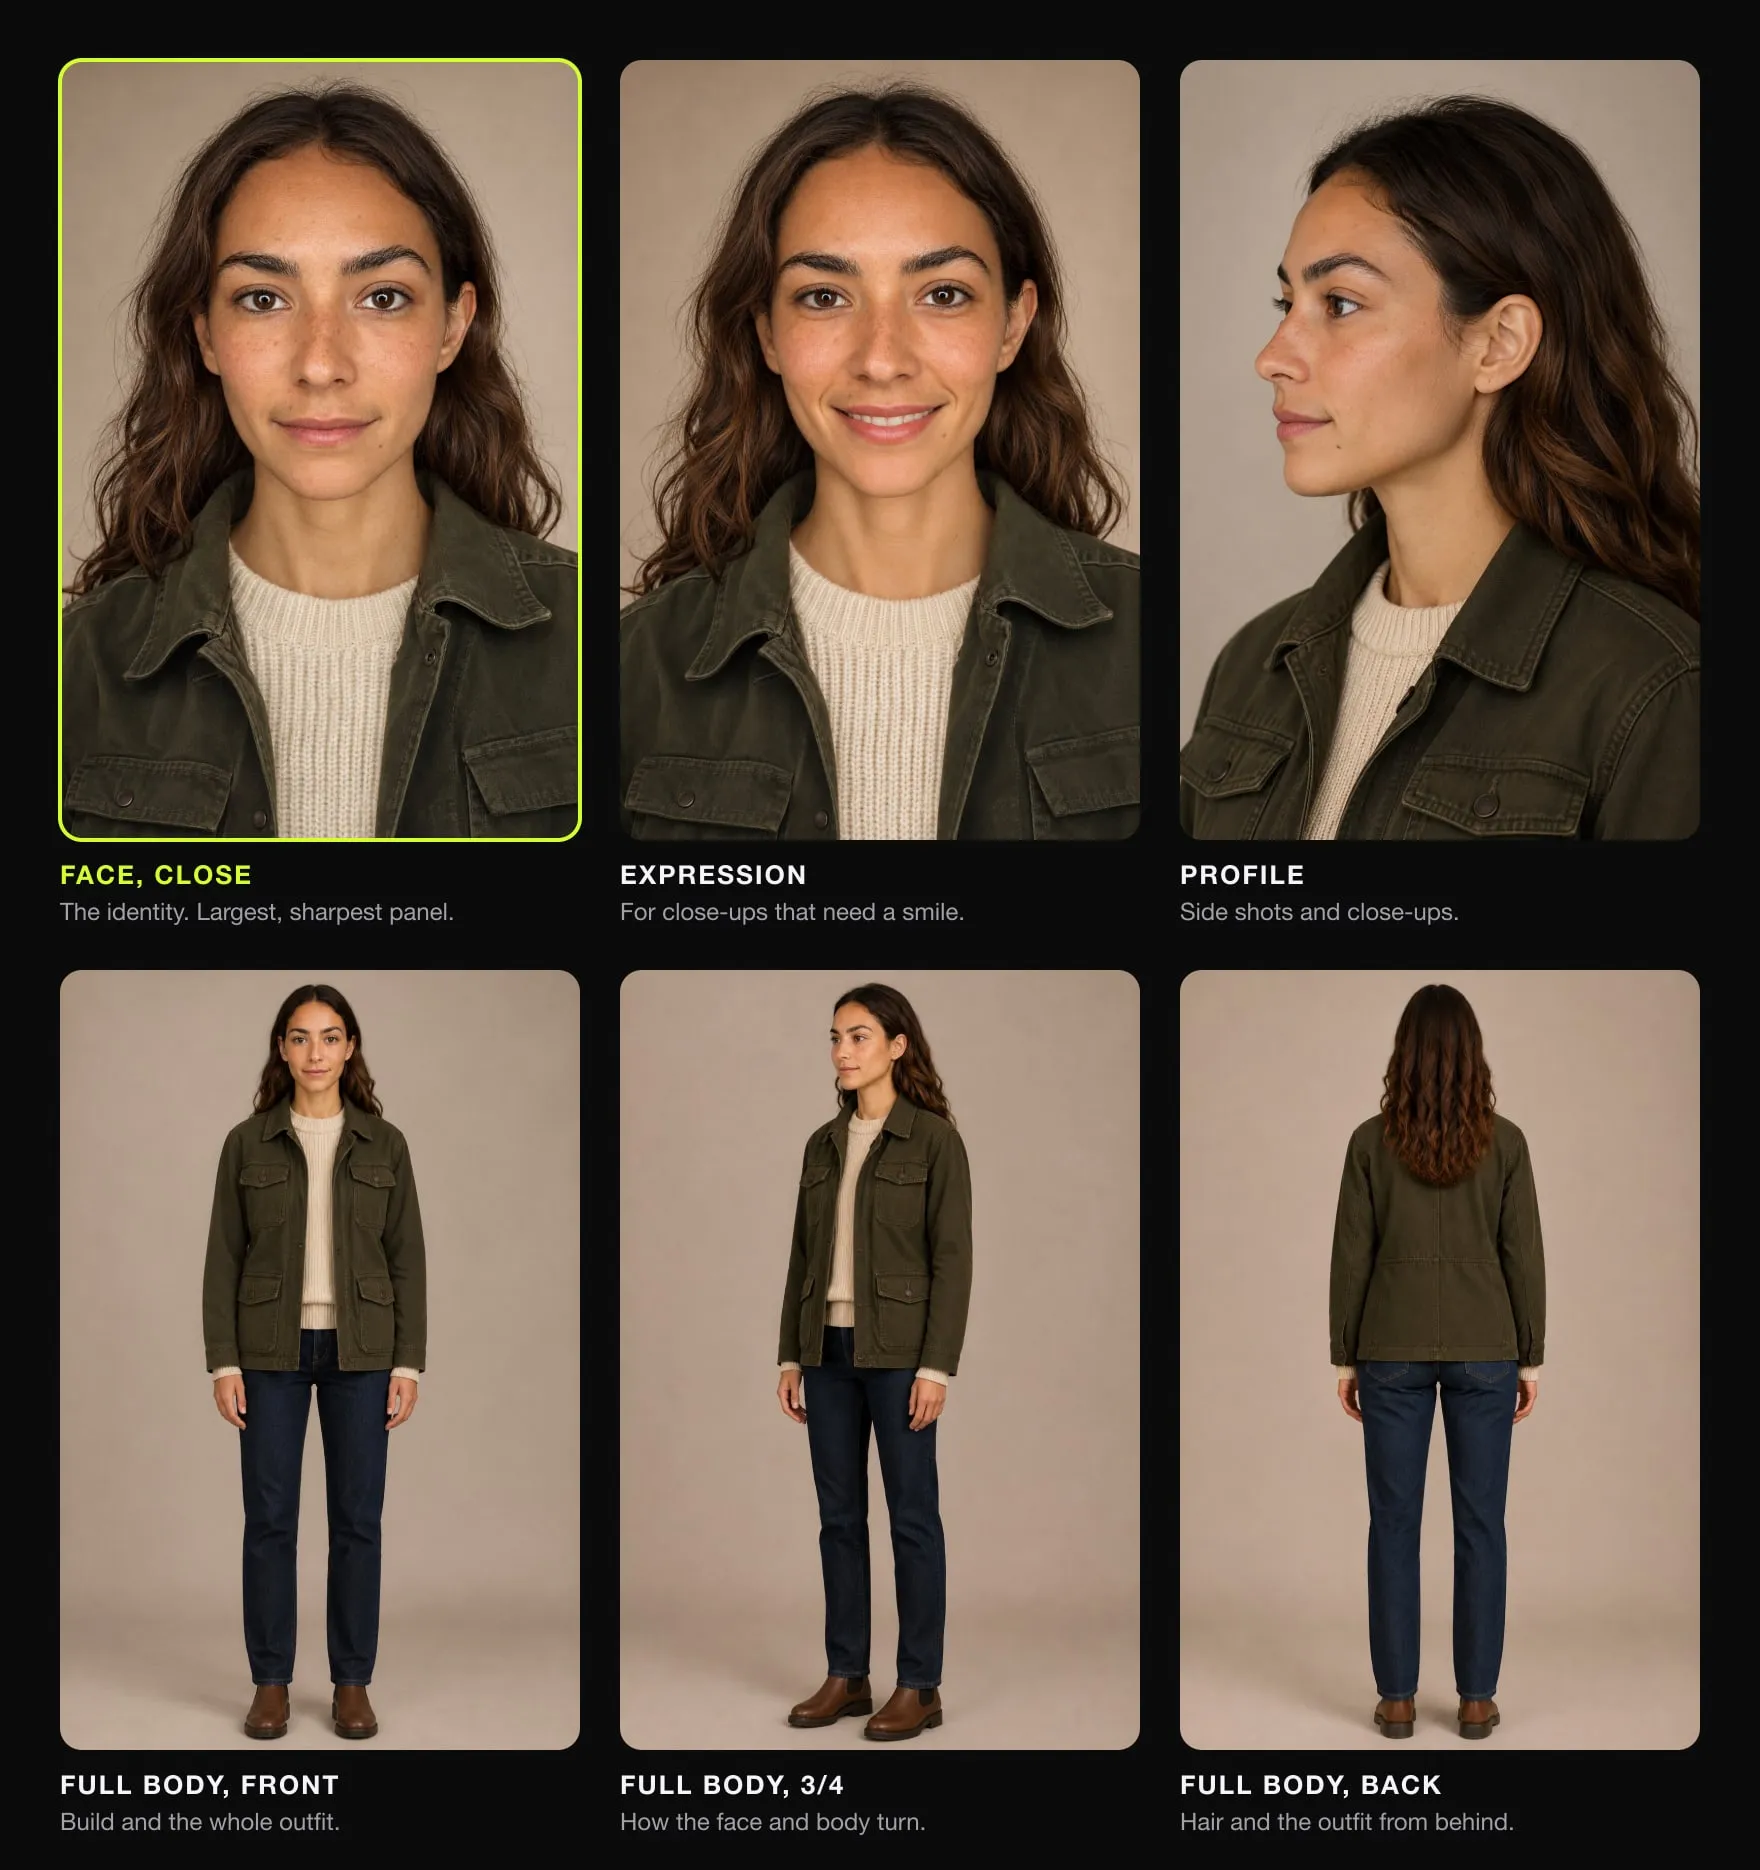
What goes on the sheet
| Panel | Why it’s there |
|---|---|
| Face close-up, large and sharp | The identity the model copies. It should be the biggest thing on the sheet. |
| Full body, front | Build, height, proportions and the whole outfit, head to shoes, nothing cropped. |
| Full body, three-quarter | How the face and body turn; keeps a three-quarter shot from drifting to a different person. |
| Full body, back | Hair from behind and the back of the outfit. Without it, a turned-away head renders as a lump. |
| Profile (optional) | Close-ups and side shots. |
| Expression (optional) | A smile or open mouth, for close-ups that need one (see “Expressions leak” below). |
Use one plain background and even light across every panel, and the same outfit in all of them. Higgsfield’s own examples use front full body, back full body and a front close-up at 16:9; the Academy’s sheet is front, back and a larger portrait. Ours adds a three-quarter view, a profile and an expression, then cuts the sheet into separate files.
One face per sheet
This is the rule that matters most. In one of our videos with three characters, all three faces sat on one sheet, and one character came out with a face that belonged to none of them. The same video with three separate face files went through on the next run.
The Academy found a subtler version of the same problem: on a single-character sheet, the small face in the full-body view never matches the big portrait exactly. Give the video model both and it gets two slightly different identities, so the face shifts between wide shots and close-ups. Their fix is a second copy of the sheet with the small face blanked out, used for video. Ours is to cut the sheet into files and send the full body only when there’s room for it. Either way: the model should see one face per character.
Cast the face before you build the sheet
Pick the face first, cheaply, then spend on the sheet. The Academy generates 5 to 20 casting portraits in an image model and keeps one. Their observation, which matches ours: some image models give near-identical faces for the same prompt, so a batch of “different” candidates is really one face six times. If your candidates look like twins, change the model or the description, not the seed.
For live-action characters we open every prompt with the same line: a photorealistic, original fictional person, not resembling any real actor or celebrity. Then age and build, face, hair, clothes from top to bottom, pose, background and light, in that order. Higgsfield’s moderation rejected prompts that named characters in our runs, and many video APIs refuse reference photos of real faces.
For the character in this guide, one prompt on Higgsfield Soul 2.0 gave four candidates for 0.5 credits: a plain grey background, a plain t-shirt, head and shoulders, neutral expression. Casting on a neutral shirt keeps the outfit out of the decision; the clothes come later, on the sheet.
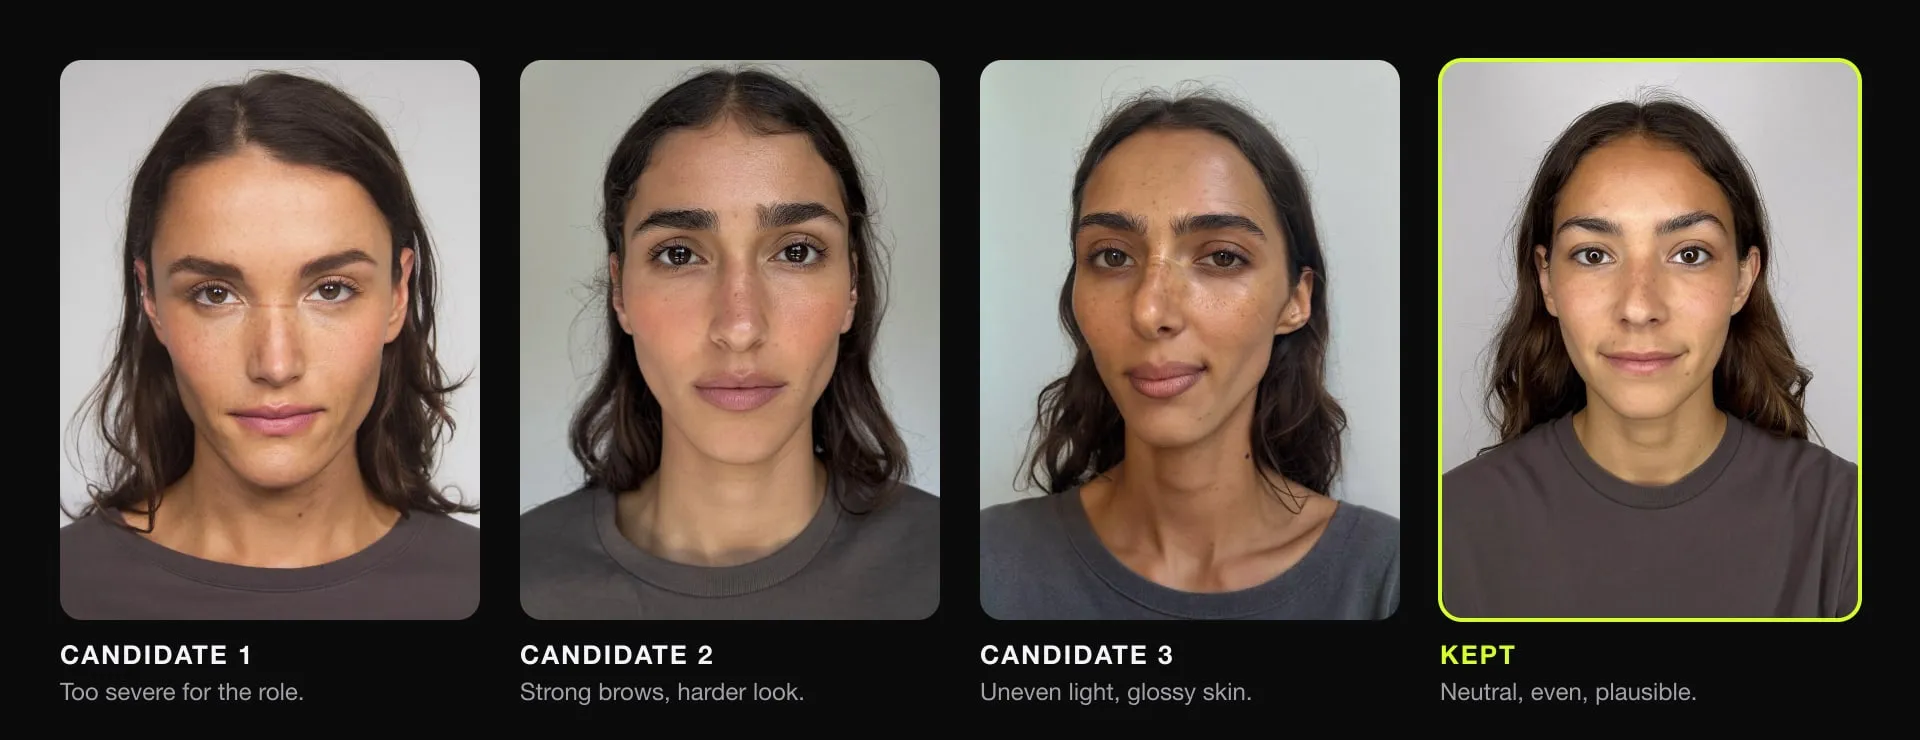
Check that the face you keep has what you asked for. The prompt asked for a thin scar through one eyebrow and a small mole above the lip. All four portraits came back without the scar and without the mole. If the marks matter, add them with an image edit on the kept portrait before building the sheet, and only then write them into the fixed description. A description that names a mark the reference doesn’t show gives the video model two versions of the face again.
Then build the sheet from the kept portrait alone. We gave it as the only reference image to ChatGPT’s image generation and made all six panels in one chat: the face first, then each later prompt opening with “the same woman as in your last image, the same face exactly”, the same outfit, backdrop and light, and only the view changing. The face held in all six without a retry. We had made the same six panels on Nano Banana before, at 1 credit each, and the face held there too, but the ChatGPT set came out at a higher resolution with better light and skin, so it is the one shown here.
Write the character once
The sheet carries the look; the text keeps the model from changing it. Keep one fixed description per character and paste it into every prompt word for word:
- Line 1, permanent: face, hair, build and anything that never changes.
- Line 2, this video’s outfit: the only line you edit per video.
For the character in this guide, the two lines were:
An original fictional woman, not resembling any real actor or celebrity, 31 years old, slim athletic build, warm olive skin with light freckles across the nose and cheeks, dark brown eyes, natural full eyebrows, dark brown wavy shoulder-length hair parted in the middle.
Outfit: an unbuttoned dark army green cotton field jacket with four flap pockets (dark army green, not khaki, not teal) over a cream ribbed knit sweater, dark indigo straight-leg jeans, brown leather Chelsea boots. No jewellery, no bag, no hat, no scarf.
When we audited our own prompts before adopting this, one character had been described 12 different ways across 13 videos, and it showed.
Three more lines that earn their place:
- Two or three invented marks for stylised characters: a mole on one cheekbone, a scar through one brow. They make the character recognisable and keep it from sliding toward a famous face. Write them in only once the reference shows them (see above).
- Height as a relation, repeated in every shot that has two people: “clearly taller than her, her head reaches his chin”. Higgsfield’s two-character guide goes further, with heights in centimetres and a ratio.
- Build, stated twice for heavy characters: generators slim them down, so write “just as broad as in the reference, never slimmer”.
Clothes
- The outfit in the scene must match the sheet. Leggings in the scene and shorts on the sheet gave us a video that flipped between the two.
- Edit the outfit on the sheet, as its own pass. The Academy changes one garment at a time on the finished sheet and asks for the same item in all views; an image editor that keeps the face does this without rebuilding the character.
- Avoid free-hanging garments. Capes, cloaks and long scarves jump sides when the person turns. If the character doesn’t need one, write that they wear none.
- Name colours so they can’t drift: “dark army green, not khaki, not teal”.
- Props and headwear go on their own image, never on the face crop, and the prompt says who holds or wears them.
Give it to the model
- Separate files, one subject. Send each view as its own image and say they all show one person (“all images define one woman; only she appears on screen”). Never number them as if they were different people. ByteDance’s Seedance 2.5 guide gives the same advice for scenes with many subjects: one image per view.
- Order by importance. In a swap or a reference-to-video shot with a scene, we send the scene frames first, then each character’s face, then each full body if slots remain. When slots run out, drop the full body before a scene frame. Per-model limits are in Seedance character consistency.
- Expressions leak. A frowning reference plus “strictly follow the references” carried the frown into the whole video. Use a neutral or smiling face and say that the references define identity only, not expression; then write the expression you want.
- Back views need their own image and a line about it. Without one, two people meant to stand back to back rendered face to face. With a back-view image and “whole body turned away: back, shoulders, hips and feet all face away”, they didn’t.
- Register the character if your tool can. On Higgsfield, a saved Element or Soul ID can be called by name in the prompt instead of attaching the images every time. Kling’s element library takes 2 to 4 images of one character.
Studio sheet or a face from the scene?
Here we and the Academy differ. The Academy feeds the grey studio sheet straight into the video. For character swaps (Genjutsu, motion transfer), we cut the face from a frame of the character already placed in the scene instead, because the clean studio look pulled our renders toward something polished and slightly cartoonish. Our guess is that it depends on the mode: reference-to-video builds a new shot around the sheet, a swap pastes the character into existing footage and wants matching light. We haven’t run a controlled A/B yet; we’ll update this section when we have.
Check before you pay for the final
- Compare against the canon. Put the sheet’s face, the face from two or three earlier videos and the new draft side by side. If any trait is gone (a mark, eye colour, hairline, age), fix it now. The Academy’s first question after every take is the same one: is it the same person every time?
- Measure the face. In our review of 20 swaps, a face 130 px or wider in the 480p draft kept its eyes, 80 to 130 px went soft, and under 80 px the eyes broke whatever the prompt said. An upscaler sharpens the damage, it doesn’t repair it. When faces are small, crop the source closer, pick another source, or render at 720p. The full method is in How to use Genjutsu.
- Light eyes are the most fragile. Pale blue and amber irises smear first on small faces; a darker, saturated colour holds.
Common faults
| What you see | Likely cause | Fix |
|---|---|---|
| The face changes between wide shots and close-ups | Two faces for one person on the input | One face per character; drop the small face in the full-body view |
| A stranger’s face on one of several characters | Several characters’ faces on one sheet | Separate face file per character |
| Four copies of the character | A multi-view collage read as four people | Separate files, “all images show one person” |
| The outfit flips mid-clip | Scene outfit differs from the sheet | Match them, or rebuild the sheet in the scene outfit |
| Cape or scarf jumps sides | Free-hanging garment | Remove it, or accept the drift |
| The character frowns the whole video | Expression copied from the reference | Neutral or smiling reference; identity-only line |
| Eyes melt in wide shots | Face under about 80 px in the draft | Closer crop, another source or 720p |
Start with one character, one sheet and a cheap draft: see How to generate on Higgsfield without wasting credits for the draft-first order of work, and the rest of our guides for references, prompts and fixing takes.
Sources
Run Higgsfield from your Mac.
Jutsu Studio is a free, open-source Higgsfield desktop app for Mac: a queue, a local library and the price on every button.